SNES Dev Refresher
This is a quickstart guide on creating a functioning Super Nintendo program from zero. It primarily serves, however, as a refresher for myself since I've spent some time away from SNES development.
All links open in a new tab.
1. Install the cc65 toolchain
cc65 is a compiler toolchain that targets the 6502 family of computers.
As you may know, the Super Nintendo is powered by a (slightly modified) Western Design Center 65c816 processor; a 16-bit upgrade in the 6502 line.

There are a handful of options at your disposal when it comes to selecting an assembler that targets the 65816. 64tass and WLA-DX are a couple that some developers swear by. ca65 is just what I've always used and it's served me well.
Though cc65 is primarily a C compiler, it ships with a macro assembler—ca65—and a linker—ld65. These two tools alone are all we need to write SNES programs in assembly! I recommend adding the cc65/bin folder to your PATH.
(For IDE-like niceties like autocompletion, go-to-definition, hover documentation, error diagnostics, and more, I highly suggest downloading ca65-lsp—a Language Server Protocol implementation made by the great techwritescode and myself—and getting it working with your editor of choice.)
2. Create a config file for the linker
The cc65 suite has many different computers which you can specify as the target of the project, making it easy for the developer to just specify which one they want and the linker will lay out the memory accordingly. However, while the toolchain does support the 65816 processor, it does not support the SNES as a pre-configured target machine. (Interestingly, it also doesn't support the Apple IIGS—the only other major machine that ran on the processor.) This means we need to tell the linker manually how to lay out the memory of the executable. So how is the memory laid out on the Super Nintendo?
These screenshots are taken from the SNESdev Wiki page on the SNES's memory layout, made by the great Damian Yerrick:
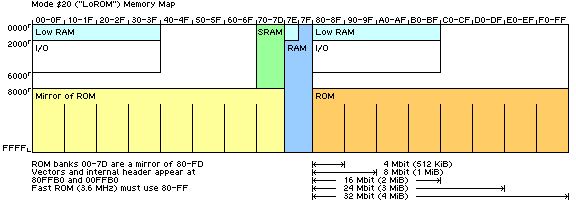

This ☝️is what we need to tell the linker. We can do that by providing a config file. Here are all the parts of this file:
The MEMORY section
Here we partition areas of code and give them custom labels to be used in the SEGMENTS section.
The two most important distinctions in memory are whether it's writable or not. The two types made by this distinction are often labeled ROM, or "read-only memory", and RAM, or "random-access memory", which is both readable and writable. RAM contains the stack, heap and BSS, or "block starting symbol", section. In fact, these two are the bare minimum we can tell the linker and get a functioning executable:
MEMORY {
	RAM: start = $0000, size = $2000;
	ROM: start = $8000, size = $8000;
}
The SEGMENTS section
Here is where we take different "segments" that are referenced in the code, and assign them to our labels we defined in the MEMORY section.
The segment names we define in this section can be invoked in the code. e.g.:
  .zeropage
some_label: .rs 1
...
The linker will then take everything you define as being in that segment, and put it in the memory section you specified.
SEGMENTS {
	BSS:    load = RAM, type = bss;
	CODE:   load = ROM, type = ro;
	RODATA: load = ROM, type = ro;
}
Here we're just telling the linker the types of the different sections. By doing this, the linker is able to throw errors when, for instance, we try to write to a read-only segment.
But the last thing that's necessary in this file is to tell the console where certain areas of code are—like where to start execution—and certain information about the program. This is done via the ROM's header.
SEGMENTS {
	BSS:     load = RAM, type = bss;
	CODE:    load = ROM, type = ro;
	RODATA:  load = ROM, type = ro;

	ROMNAME: load = ROM, start =  $FFC0;
	ROMINFO: load = ROM, start =  $FFD5;
	VECTORS: load = ROM, start =  $FFE4;
}
ROMNAMEis a 21-character ASCII representation of the program's name.ROMINFOwill contain various flags & numbers indicating various information about the program.VECTORSdefines addresses of code where certain interrupt handlers live, likereset, the place where code starts executing when you power on or reset the console.
And so, here is our file we can call lorom.cfg:
MEMORY {
	RAM:     start = $0000, size = $2000;
	ROM:     start = $8000, size = $8000;
}

SEGMENTS {
	BSS:     load = RAM, type = bss;
	CODE:    load = ROM, type = ro;
	RODATA:  load = ROM, type = ro;

	ROMNAME: load = ROM, start =  $FFC0;
	ROMINFO: load = ROM, start =  $FFD5;
	VECTORS: load = ROM, start =  $FFE4;
}
3. Supply information about the ROM
The last thing we need to do before we can start coding is fill the aforementioned header information (referred to by the ROMNAME, ROMINFO and VECTORS sections) to tell the console certain things about the ROM. If you'd like, you can read more about this header information here.
Let's create a file called header.inc to store this information. (.s and .asm are popular extensions for assembler source code files; .inc is commonly used for "static" files that aren't touched often but included and used regularly in the main program; another use is using .inc files similar to C header (.h) files.) We can fill in all the header info as such:
.segment "ROMNAME"
NameStart:
.byte "REFRESHER"
.res (21 - (*-NameStart)), ' ' ; empty space should be filled with spaces

.segment "ROMINFO"
.byte %00110000    ; FastROM
.byte 0            ; no battery or expansion chips or whatever
.byte 7            ; 128kb
.byte 0            ; 0kb SRAM
.byte 0, 0         ; developer ID
.byte 0            ; version num
.word $aaaa, $5555 ; checksum & complement

.segment "VECTORS"
; native mode vectors
.word 0	           ; COP
.word 0            ; BRK
.word 0            ; ABORT (not used in the SNES)
.word nmi          ; NMI
.word 0	           ;
.word 0	           ; IRQ
.word 0	           ;
.word 0	           ;
; emulation mode vectors
.word 0            ; COP
.word 0            ;
.word 0            ; ABORT
.word 0            ; NMI
.word reset        ; RESET
.word 0            ; IRQ/BRK
4. Render a black screen
At long last, we can get started actually programming!
Create a file called main.s that contains the following code:
.p816 ; enable the 65816 instruction set
.smart ; assembler will 'smartly' tell when we switch register sizes

.include "inc/header.inc"

.code

.a8 ; I believe declaring the expected register sizes before every procedure is good practice
.i8
reset:
	; init code goes here

forever:
	; update code goes here
	jmp forever

nmi: ; this interrupt occurs once per frame
	; code that interacts with the PPU goes here
	rti
This is just about the bare minimum (and I mean bare) of code that can be compiled. Save the file and run…
ca65 main.s -o main.o
ld65 main.o -o refresher.sfc -C lorom.cfg
…and voilà! You have a .sfc (an unofficial but widely accepted extension that's short for Super Famicom) executable that can run on a Super Nintendo or an emulator. Run it in Mesen and, unspurprisingly, you should see a black screen:

5. Render a blue screen
Being able to get a colored screen to show up is perhaps the closest thing to a "hello world" program for early game consoles that didn't natively support text output; the simplest program (that at least does something) that could possibly run. There's only a couple more things that need to be done to accomplish this.
The console boots up with completely random values throughout all of its volatile memory; as such, it's in an "unstable" state at the moment. We need to wrangle the console into a stable state.
Basic CPU initialization
The 65816 boots up in "emulation mode", where it emulates the 6502. (This was done with the goal in mind that the 65816 could be a "drop-in" replacement for the 6502.) In order to actually go into "native" mode, where the processor can make use of its 16-bit capabilities, run the following two instructions:
clc
xce
This sets the "emulation" bit to 0—thus going into native mode. You can now have a 16-bit accumulator and 16-bit index registers! (and a bunch more stuff.)
It's common to (most of the time) actually have the accumulator in 8-bit mode, and only the index registers in 16-bit mode. Might seem odd and wasteful, but you'd be surprised how often you need to do operations only 8 bits at a time, even on a 16 bit console. Let's tell the CPU to make this change by modifying the appropriate bits in the status register:
sep #%00100000 ; 8-bit A register
rep #%00010000 ; 16-bit X & Y registers
Next, we want the stack to be in a good spot; somewhere that doesn't disturb an otherwise congruent block of RAM, but somewhere it has lots of room to grow. I recommend the very end of "low" RAM: $1fff. Remember, the stack grows backward.
ldx #$1fff
txs
Now your reset interrupt handler should look like this:
reset:
	clc
	xce ; go into native mode

	sep #%00100000 ; 8-bit A register
	rep #%00010000 ; 16-bit X & Y registers

	ldx #$1fff
	txs
snes.inc
In every one of my projects I include a (pretty big) file called snes.inc. This file defines every PPU, CPU and APU register on the console, with the aliases the official development manual calls them, as well as some helpful comments explaining what everything is. It is there solely to aid in actual development; do not worry about understanding anything in it. You don't even have to open it if you don't want to.
Download this file into your project folder, and add .include "./snes.inc" to the top of main.s, right underneath the "header.inc" include.
PPU Registers
The console's main CPU interacts with the graphical interface through registers. Through writing certain values to these registers, we can control what the console displays on the screen.
There exists an official SNES development manual that Nintendo of America distributed to developers at the time; I will not link it here or show screenshots, but there *may or may not* be a PDF of it easily available on the internet. On page 2-26-1 of it, it lays out the recommended values to initialize all of the PPU registers to. This code does just that:
; official SNES dev manual's recommended startup register values
lda #INIDISP_BLANK | $ff
sta INIDISP              ; turn off screen
stz BGMODE               ; make sure we're in mode 0
stz TM                   ; disable all BG's and sprites
stz NMITIMEN             ; disable interrupts
This is a very small subset of the full initialization code needed to make the program runnable on real hardware; there are far more PPU, CPU and APU registers left to clear. These are only the ones that will affect what we're trying to do. Notice the very first one, INIDISP: that register write is turning the screen off. This is very important and allows us to perform more writes to the PPU.
For now you can just throw this code underneath the other instructions you just wrote, in your reset interrupt handler. It's messy but we can clean up later.
The good news is we're almost there. Even though if you build and run you still see a black screen, the console is now in a stable state, and we are free to do what we wish with it. (I know WRAM and VRAM have not been cleared, but for our purposes, neither is needed.)
The only thing left to do now is set the background color! The SNES has a 512-byte block of VRAM called "CGRAM" (CG = "color generator" I believe. Basically, color palettes.) The first color of this memory is what the console considers the background color! Let's tell the PPU we're writing to the very first color (two bytes) of CGRAM, and write our blue color:
; SNES color values are 15-bit:
;           0bbbbbgggggrrrrr
BG_COLOR = %0101000100001000

stz CGADD
lda #<BG_COLOR ; lower 8 bits of 16-bit value
sta CGDATA
lda #>BG_COLOR ; upper 8 bits of 16-bit value
sta CGDATA
And last but not least: let's turn the screen back on! Remember the INIDISP register from before?
lda #$f ; maximum brightness
sta INIDISP
By now, your main.s should look like this:
.p816
.smart

.include "inc/header.inc"
.include "inc/snes.inc"

.code

.a8
.i8
reset:
	clc
	xce ; go into native mode

	sep #%00100000 ; 8-bit A register
	rep #%00010000 ; 16-bit X & Y registers

	ldx #$1fff
	txs

	; official SNES dev manual's recommended startup register values
	lda #INIDISP_BLANK | $ff
	sta INIDISP
	stz BGMODE
	stz TM
	stz SETINI
	stz NMITIMEN

	; SNES color values are 15-bit:
	;           0bbbbbgggggrrrrr
	BG_COLOR = %0101000100001000

	stz CGADD
	lda #<BG_COLOR
	sta CGDATA
	lda #>BG_COLOR
	sta CGDATA

	; turn on the screen
	lda #$f ; maximum brightness
	sta INIDISP

forever:
	; update code goes here
	jmp forever

nmi:
	; code that interacts with the PPU goes here
	rti
Now build the project with the same commands as before and run it in Mesen. You should see a blue screen!

See if you can make it green instead of blue!
Bonus: Clean up
So our program works, but there's a lot of nitty gritty code in main.s. This is our top-level file, where someone reading our code should be able to see a birds-eye view of our program's flow. Let's hide the details in other files.
Create a src folder where all the source code lives. Inside the folder create a file called ppu.s. This file should have it's own scope so as to avoid name conflicts with other files. It could look something like this:
.scope ppu

.code

.i16
.a8
.proc Zero
	; official SNES dev manual's recommended startup register values
	lda #INIDISP_BLANK | $ff
	sta INIDISP
	stz BGMODE
	stz TM
	stz SETINI
	stz NMITIMEN
	rts
.endproc

.i16
.a8
.proc Init
	; SNES color values are 15-bit:
	;           0bbbbbgggggrrrrr
	BG_COLOR = %0110000100001000

	stz CGADD
	lda #<BG_COLOR
	sta CGDATA
	lda #>BG_COLOR
	sta CGDATA

	; turn on screen
	lda #$f
	sta INIDISP

	rts
.endproc

.endscope
Your main.s can then be shortened as such:
.p816
.smart

; inc
.include "inc/header.inc"
.include "inc/snes.inc"

; src
.include "src/ppu.s"

.code

.a8
.i8
reset:
	clc
	xce

	sep #%00100000
	rep #%00010000

	ldx #$1fff
	txs

	jsr ppu::Zero
	jsr ppu::Init

forever:
	jmp forever

nmi:
	rti
You can even save a few cycles by changing ppu::Zero and ppu::Init to macros instead of procedures, since they're only called once each; thus getting rid of the jsr instruction as well as the rts instruction for both. (If you're familiar with other low-level languages like C++ or Rust, you can think of this as inlining a function.)
I personally like to put underscores in numbers, especially binary numbers, to make them easier to read. In ca65 this can be enabled via the underline_in_numbers feature:
.feature underline_in_numbers
And now we can separate the logical regions of the binary BG_COLOR:
;           0 bbbbb ggggg rrrrr
BG_COLOR = %0_10100_01000_01000
Helpful resources
- Programming the 65816 book. Very easy to find a PDF of it online.
- SNESdev Wiki - invaluable.
- wiki.superfamicom.org. Also very helpful.